

Serverinizde haritalarda kasma,donma,takılma gibi bir çok problemden şikayetçi olabilirsiniz düşük sistemlerde bu sıkça karşımıza çıkmaktadır bunun için aşağıda bulunan sistemi deneyebilirsiniz 
Örnek ; Sizin karakterinizin etrafındaki objeler gözükücektir daha uzaktaki objeler siz oraya gittikçe render olacak ve görünücektir bu yüzden kasma takılma vb olma olasılığını düşürücektir..
Örnek ; Sizin karakterinizin etrafındaki objeler gözükücektir daha uzaktaki objeler siz oraya gittikçe render olacak ve görünücektir bu yüzden kasma takılma vb olma olasılığını düşürücektir..
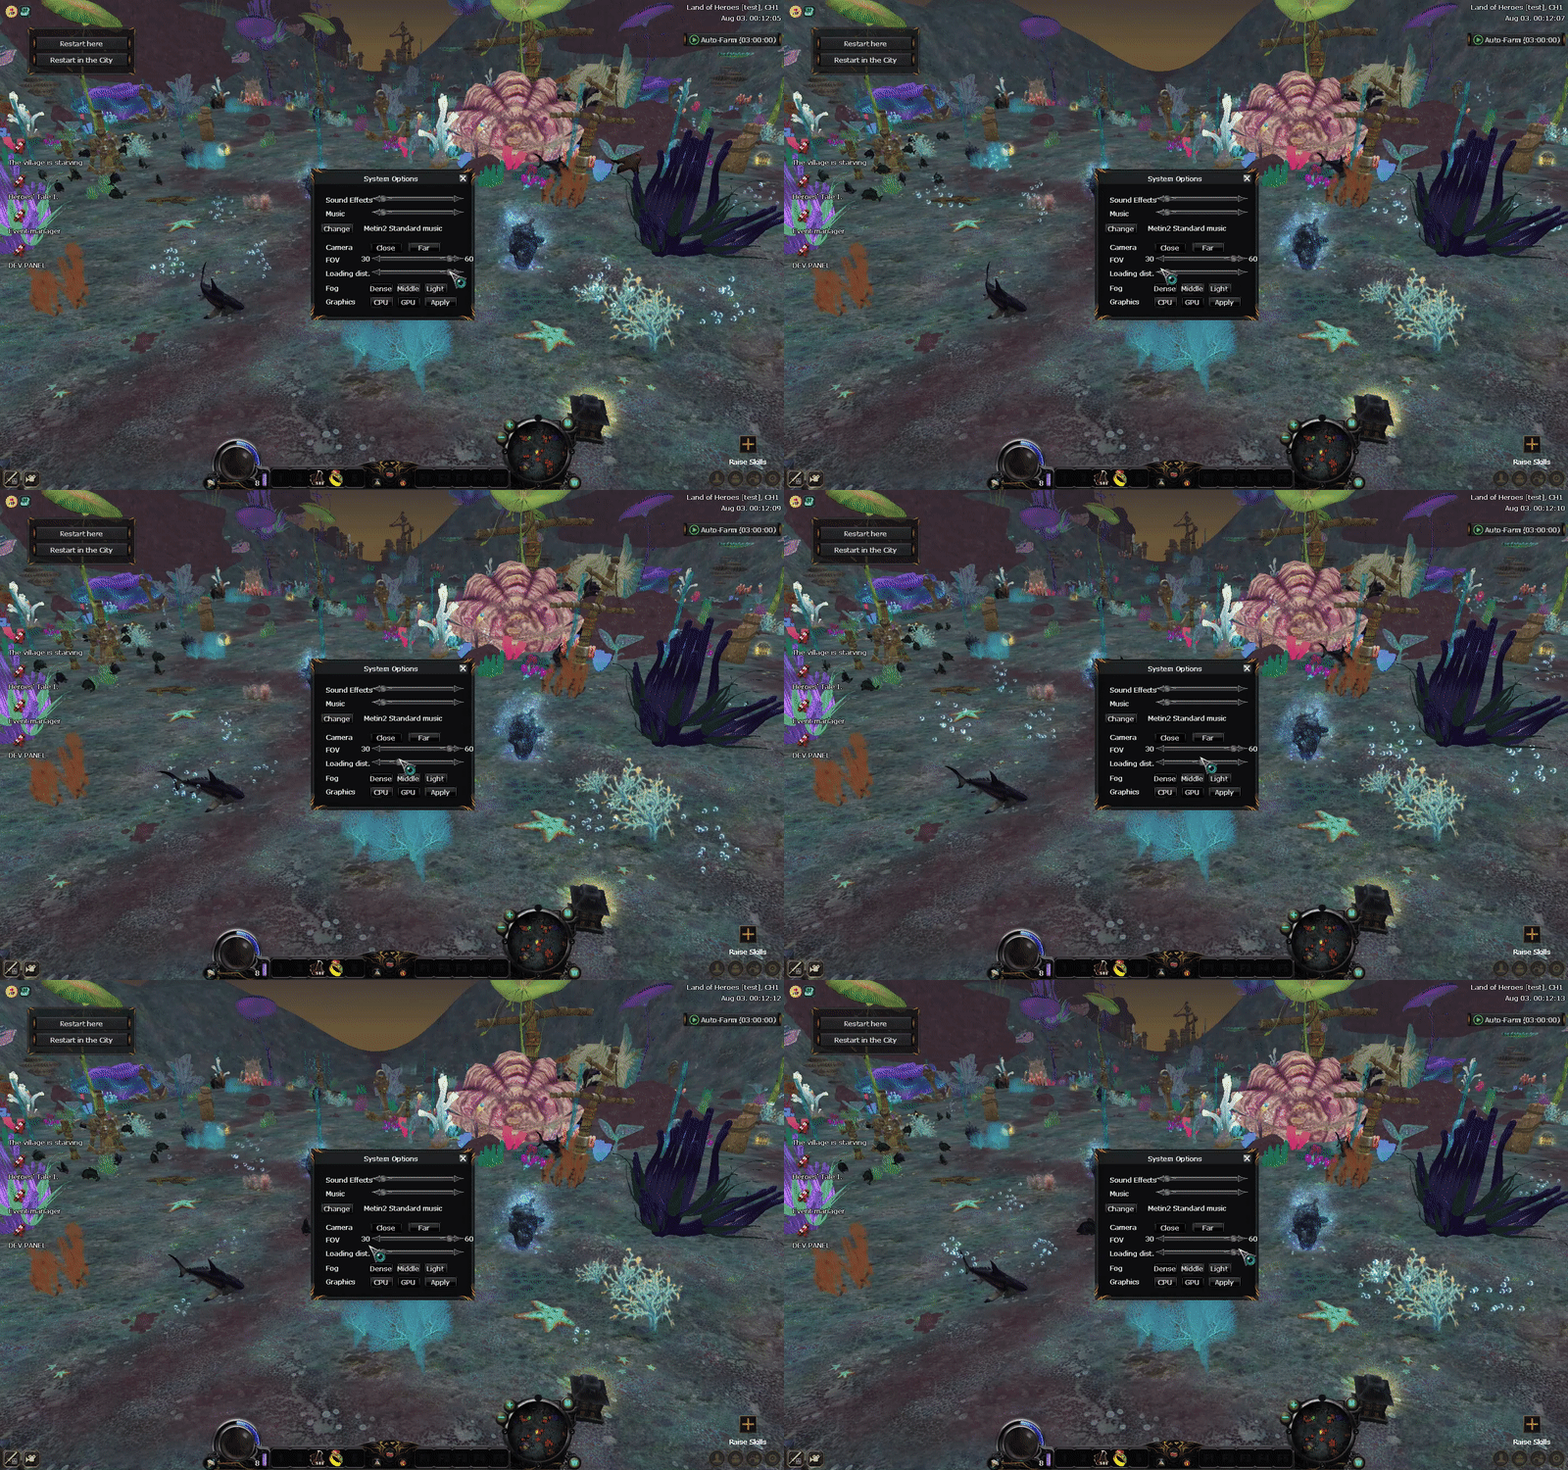
İlk Olarak Sunucu Dosyalarımızdan : EterBase/Utils.h Giriş Yapın. ( Alta Verilen Kodları Ekleyiniz )
Kod:
template<typename T> constexpr T LinearInterpolation(const T& tMin, const T& tMax, float fRatio) { return T((1.0f - fRatio) * tMin + fRatio * tMax); } template<typename T> constexpr T HermiteInterpolation(const T& tMin, const T& tMax, float fRatio) { fRatio = MINMAX(0.0f, fRatio, 1.0f); fRatio = fRatio * fRatio * (3.0f - 2.0f * fRatio); return LinearInterpolation(tMin, tMax, fRatio); }2. GameLib/Area.h Giriş Yapıyoruz. ( BU KODU )
2.1. Bu Kod İle Değiştiriyoruz.
2.2. Ardından Yeniliyoruz
2.3. Ardından Bu Kodu Giriş Yapın
2.4. Altaki kodu aratıyoruz.
2.5. Alta Bulunan Kodu Ekleyiniz.
2.6. Ardından Tekrar Arama Kısmına yazıp Aratıyoruz
2.7. Bu Kısmada Bu Kodu Ekleyiniz
2.8. Tekrardan Arama kısmına Alta Bulunan Kodu Yazınız
2.9. Bu Kod İle Değiştiriniz
Kod:
void Update();
Kod:
void Update(D3DXVECTOR3& v3Player);
Kod:
void Refresh();
Kod:
void Refresh ( TObjectInstance * pObjectInstance , bool bRemove );
Kod:
void __UpdateAniThingList();
Kod:
void __UpdateLoadedObjectInstances(D3DXVECTOR3& v3Player); void __UpdateEffectList(D3DXVECTOR3& v3Player); float GetMaxLoadingDistanceSqr() const;
Kod:
BOOL m_bPortalEnable;
Kod:
std::vector<CEffectInstance*> m_kVct_pkEftInstSort; // for rendering int m_iUpdateCount;
Kod:
dwEffectInstanceIndex = 0xffffffff;
Kod:
dwEffectInstanceIndex = 0;Şimdi GameLib/Area.cpp: Giriş Yapalım ve Kodu Ekleyelim
Kod:
#include "../UserInterface/PythonApplication.h"
Kod:
void CArea::__UpdateLoadedObjectInstances(D3DXVECTOR3& v3Player) { const float fMaxDist = GetMaxLoadingDistanceSqr(); const DWORD dwStartTime = ELTimer_GetMSec(); DWORD i = 0; for (auto it = m_ObjectInstanceVector.begin(); it != m_ObjectInstanceVector.end(); ++it, ++i) { const TObjectData* c_pObjectData; if (!GetObjectDataPointer(i, &c_pObjectData)) continue; bool bDidModify = false; const float fDist = (v3Player.x - c_pObjectData->Position.x) * (v3Player.x - c_pObjectData->Position.x) + (v3Player.y - c_pObjectData->Position.y) * (v3Player.y - c_pObjectData->Position.y); if (fMaxDist > fDist) { if ((*it) == nullptr) { *it = ms_ObjectInstancePool.Alloc(); (*it)->Clear(); __SetObjectInstance(*it, c_pObjectData); // ĂÖŔűČżë if ((*it)->dwType == prt::PROPERTY_TYPE_BUILDING) m_GraphicThingInstanceCRCMap.emplace(TGraphicThingInstanceCRCMap::value_type((*it)->pThingInstance, c_pObjectData->dwCRC)); Refresh(*it, false); bDidModify = true; } } else { if ((*it) != nullptr) { if ((*it)->dwType == prt::PROPERTY_TYPE_BUILDING) m_GraphicThingInstanceCRCMap.erase((*it)->pThingInstance); Refresh(*it, true); __Clear_DestroyObjectInstance(*it); *it = nullptr; bDidModify = true; } } if (bDidModify) { const DWORD dwElapsed = ELTimer_GetMSec() - dwStartTime; if (dwElapsed > 2) break; } } } void CArea::__UpdateEffectList(D3DXVECTOR3& v3Player) { m_kVct_pkEftInstSort.clear(); const int iUpdateFPS = MAX(2, CPythonApplication::Instance().GetUpdateFPS()); const float fMaxDist = GetMaxLoadingDistanceSqr(); if (CEffectManager* pEffectManager = CEffectManager::InstancePtr()) { // Effect for (auto i = m_EffectInstanceMap.begin(); i != m_EffectInstanceMap.end();) { CEffectInstance* pEffectInstance = i->second; const D3DMATRIX& gMatrix = pEffectInstance->GetGlobalMatrix(); const float fDist = (v3Player.x - gMatrix._41) * (v3Player.x - gMatrix._41) + (v3Player.y - gMatrix._42) * (v3Player.y - gMatrix._42); const int iDistRatio = HermiteInterpolation(1, iUpdateFPS / 2, fDist / fMaxDist); if (m_iUpdateCount % iDistRatio == 0) pEffectInstance->Update(); if (!pEffectInstance->isAlive()) { i = m_EffectInstanceMap.erase(i); pEffectManager->DestroyUnsafeEffectInstance(pEffectInstance); continue; } if (pEffectInstance->isShow()) { m_kVct_pkEftInstSort.emplace_back(pEffectInstance); } ++i; } } ++m_iUpdateCount; if (m_iUpdateCount > iUpdateFPS) m_iUpdateCount = 0; } float CArea::GetMaxLoadingDistanceSqr() const { int peNum; float pfStart, pfEnd, pfFarClip; CPythonBackground::instance().GetDistanceSetInfo(&peNum, &pfStart, &pfEnd, &pfFarClip); return pfFarClip * pfFarClip; }CArea::CArea Giriş Yapalım
CArea::__SetObjectInstance_SetEffect Kodu Bulun ve Aşağıdaki Kod ile Değiştirelim.
CArea::__Clear_DestroyObjectInstance Kodunu Bulunuz Değiştiriniz
CArea::Update Yükleme İşlevini Bulalım ve Değiştirelim
CArea::Refresh İşlevini Bulalım ve Değiştirelim
CArea::__Load_BuildObjectInstances Bulalım ve Değiştirelim
CArea::GetObjectInstancePointer Arayıp Sonucu Aşağıdaki Kod İle Değiştirelim
Kod:
BU KODU m_wX = m_wY = 0xFF; BU KODU EKLEYELİM İÇİNE m_iUpdateCount = 0;CArea::__SetObjectInstance_SetEffect Kodu Bulun ve Aşağıdaki Kod ile Değiştirelim.
Kod:
pObjectInstance->dwEffectInstanceIndex = m_EffectInstanceMap.size();
Kod:
pObjectInstance->dwEffectInstanceIndex = (DWORD)pEffectInstance;CArea::__Clear_DestroyObjectInstance Kodunu Bulunuz Değiştiriniz
Kod:
if (pObjectInstance->dwEffectInstanceIndex!=0xffffffff) if (pObjectInstance->dwEffectInstanceIndex!=0) pObjectInstance->dwEffectInstanceIndex = 0xffffffff; pObjectInstance -> dwEffectInstanceIndex = 0 ;CArea::Update Yükleme İşlevini Bulalım ve Değiştirelim
Kod:
void CArea::Update(D3DXVECTOR3& v3Player) { __UpdateLoadedObjectInstances(v3Player); __UpdateAniThingList(); __UpdateEffectList(v3Player); }CArea::Refresh İşlevini Bulalım ve Değiştirelim
Kod:
void CArea::Refresh(TObjectInstance* pObjectInstance, bool bRemove) { if (!pObjectInstance) return; if (prt::PROPERTY_TYPE_TREE == pObjectInstance->dwType) { if (pObjectInstance->pTree) { if (bRemove) { auto it = std::find(m_TreeCloneInstaceVector.begin(), m_TreeCloneInstaceVector.end(), pObjectInstance->pTree); if (it != m_TreeCloneInstaceVector.end()) m_TreeCloneInstaceVector.erase(it); } else { m_TreeCloneInstaceVector.emplace_back(pObjectInstance->pTree); const float* pfPosition; pfPosition = pObjectInstance->pTree->GetPosition(); pObjectInstance->pTree->UpdateBoundingSphere(); pObjectInstance->pTree->UpdateCollisionData(); } } } else if (prt::PROPERTY_TYPE_BUILDING == pObjectInstance->dwType) { if (bRemove) { auto it = std::find(m_ThingCloneInstaceVector.begin(), m_ThingCloneInstaceVector.end(), pObjectInstance->pThingInstance); if (it != m_ThingCloneInstaceVector.end()) m_ThingCloneInstaceVector.erase(it); if (pObjectInstance->pThingInstance->IsMotionThing()) { auto it = std::find(m_AniThingCloneInstanceVector.begin(), m_AniThingCloneInstanceVector.end(), pObjectInstance->pThingInstance); if (it != m_AniThingCloneInstanceVector.end()) m_AniThingCloneInstanceVector.erase(it); } if (pObjectInstance->isShadowFlag) { auto it = std::find(m_ShadowThingCloneInstaceVector.begin(), m_ShadowThingCloneInstaceVector.end(), pObjectInstance->pThingInstance); if (it != m_ShadowThingCloneInstaceVector.end()) m_ShadowThingCloneInstaceVector.erase(it); } } else { pObjectInstance->pThingInstance->Update(); pObjectInstance->pThingInstance->Transform(); pObjectInstance->pThingInstance->Show(); pObjectInstance->pThingInstance->DeformAll(); m_ThingCloneInstaceVector.emplace_back(pObjectInstance->pThingInstance); pObjectInstance->pThingInstance->BuildBoundingSphere(); pObjectInstance->pThingInstance->UpdateBoundingSphere(); if (pObjectInstance->pThingInstance->IsMotionThing()) { m_AniThingCloneInstanceVector.emplace_back(pObjectInstance->pThingInstance); pObjectInstance->pThingInstance->SetMotion(0); } if (pObjectInstance->isShadowFlag) { m_ShadowThingCloneInstaceVector.emplace_back(pObjectInstance->pThingInstance); } if (pObjectInstance->pAttributeInstance) { pObjectInstance->pThingInstance->UpdateCollisionData(&pObjectInstance->pAttributeInstance->GetObjectPointer()->GetCollisionDataVector()); pObjectInstance->pAttributeInstance->RefreshObject(pObjectInstance->pThingInstance->GetTransform()); pObjectInstance->pThingInstance->UpdateHeightInstance(pObjectInstance->pAttributeInstance); } } } else if (prt::PROPERTY_TYPE_EFFECT == pObjectInstance->dwType) { } else if (prt::PROPERTY_TYPE_AMBIENCE == pObjectInstance->dwType) { if (bRemove) { auto it = std::find(m_AmbienceCloneInstanceVector.begin(), m_AmbienceCloneInstanceVector.end(), pObjectInstance->pAmbienceInstance); if (it != m_AmbienceCloneInstanceVector.end()) m_AmbienceCloneInstanceVector.erase(it); } else { m_AmbienceCloneInstanceVector.emplace_back(pObjectInstance->pAmbienceInstance); } } else if (prt::PROPERTY_TYPE_DUNGEON_BLOCK == pObjectInstance->dwType) { if (bRemove) { auto it = std::find(m_DungeonBlockCloneInstanceVector.begin(), m_DungeonBlockCloneInstanceVector.end(), pObjectInstance->pDungeonBlock); if (it != m_DungeonBlockCloneInstanceVector.end()) m_DungeonBlockCloneInstanceVector.erase(it); } else { pObjectInstance->pDungeonBlock->Update(); pObjectInstance->pDungeonBlock->Deform(); pObjectInstance->pDungeonBlock->UpdateBoundingSphere(); m_DungeonBlockCloneInstanceVector.emplace_back(pObjectInstance->pDungeonBlock); if (pObjectInstance->pAttributeInstance) { pObjectInstance->pDungeonBlock->UpdateCollisionData(&pObjectInstance->pAttributeInstance->GetObjectPointer()->GetCollisionDataVector()); pObjectInstance->pAttributeInstance->RefreshObject(pObjectInstance->pDungeonBlock->GetTransform()); pObjectInstance->pDungeonBlock->UpdateHeightInstance(pObjectInstance->pAttributeInstance); } } } }
Kod:
void CArea::__Load_BuildObjectInstances() { m_ObjectInstanceVector.clear(); m_ObjectInstanceVector.resize(GetObjectDataCount(), nullptr); m_GraphicThingInstanceCRCMap.clear(); std::sort(m_ObjectDataVector.begin(), m_ObjectDataVector.end(), ObjectDataComp()); }CArea::GetObjectInstancePointer Arayıp Sonucu Aşağıdaki Kod İle Değiştirelim
Kod:
const bool CArea::GetObjectInstancePointer(const DWORD & dwIndex, const TObjectInstance ** ppObjectInstance) const { if (dwIndex >= m_ObjectInstanceVector.size()) return false; *ppObjectInstance = m_ObjectInstanceVector[dwIndex]; return (*ppObjectInstance) != nullptr; }:2gamer:BİLİYORUM SIKILDINIZ DURMADAN KOD EKLEMEKTEN AMA SABREDİN ÇOK AZ KALDI HERŞEY SİZ VE OYUNCULARINIZ İÇİN :cheer2:
HERŞEY SİZ VE OYUNCULARINIZ İÇİN :cheer2:CArea::RenderEffect Bulalım ve Değiştirelim
CArea::RefreshPortal Giriş Yapalım ve Altaki Kodları Ekleyiniz Sırayla
CArea::Clear function Buluyoruz Tekrar ve Değiştiriyoruz
GameLib/MapOutdoor.h Giriş Yapın ve 1 Kodu Bulalım ardından silip 2 ci Kodu Ekleyelim
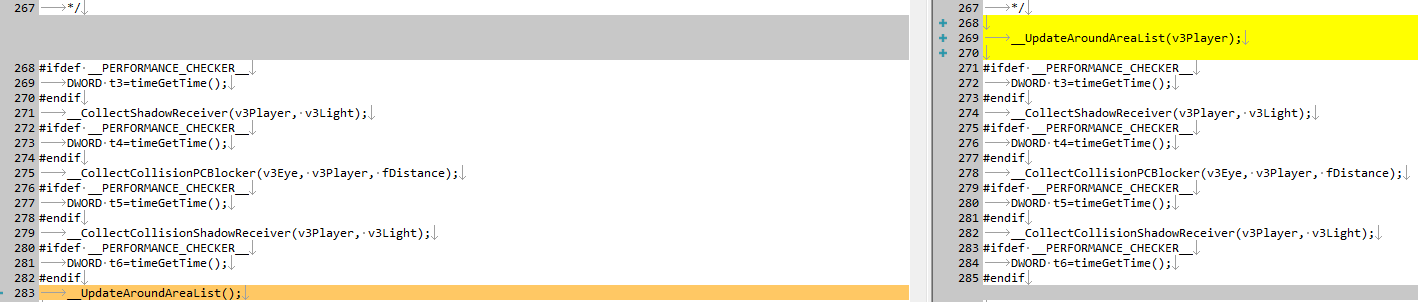
GameLib/MapOutdoorUpdate.cpp Giriş Yapalım CMapOutdoor::__Game_UpdateArea Bulalım ve Kaldıralım
1 KALDIRILACAK :
2 EKLENECEK :
3 SONUÇ :
Kod:
void CArea::RenderEffect() { // Effect STATEMANAGER.SetTexture(0, NULL); STATEMANAGER.SetTexture(1, NULL); std::sort(m_kVct_pkEftInstSort.begin(), m_kVct_pkEftInstSort.end(), CArea_LessEffectInstancePtrRenderOrder()); std::for_each(m_kVct_pkEftInstSort.begin(), m_kVct_pkEftInstSort.end(), CArea_FEffectInstanceRender()); }CArea::RefreshPortal Giriş Yapalım ve Altaki Kodları Ekleyiniz Sırayla
Kod:
TObjectInstance * pInstance = m_ObjectInstanceVector[i];
Kod:
if (!pInstance) continue;
Kod:
TObjectInstance * pObjectInstance = *it;
Kod:
if (!pObjectInstance) continue;CArea::Clear function Buluyoruz Tekrar ve Değiştiriyoruz
Kod:
for (it = m_ObjectInstanceVector.begin();it!=m_ObjectInstanceVector.end();++it) __Clear_DestroyObjectInstance(*it);
Kod:
for (it = m_ObjectInstanceVector.begin(); it != m_ObjectInstanceVector.end(); ++it) { if ((*it) != nullptr) __Clear_DestroyObjectInstance(*it); }
Kod:
void __UpdateAroundAreaList();
Kod:
void __UpdateAroundAreaList(D3DXVECTOR3& v3Player);1 KALDIRILACAK :
Kod:
__UpdateAroundAreaList
Kod:
__UpdateAroundAreaList(v3Player);
Kod:
__CollectShadowReceiver(v3Player, v3Light);Son Olarak CMapOutdoor::__UpdateAroundAreaList Bulun ve Altaki Kod İle Değiştirelim
Kod:
void CMapOutdoor::__UpdateAroundAreaList(D3DXVECTOR3& v3Player) { #ifdef __PERFORMANCE_CHECKER__ DWORD ft1=timeGetTime(); #endif DWORD at[AROUND_AREA_NUM]; for (int i = 0; i < AROUND_AREA_NUM; ++i) { DWORD t1=timeGetTime(); CArea * pArea; if (GetAreaPointer(i, &pArea)) pArea->Update(v3Player); DWORD t2=timeGetTime(); at[i]=t2-t1; } #ifdef __PERFORMANCE_CHECKER__ DWORD ft2=timeGetTime(); if (ft2-ft1>5) { for (int i=0; i<AROUND_AREA_NUM; ++i) Tracef("Area %d %d\n", i, at[i]); } #endif }İyi ForumlarDilerim.
Görüş Mesafesi Sistemi Nedir?
Metin2 özel sunucularında oyun deneyimini artırmak ve stratejik derinlik kazandırmak için geliştirilen sistemlerden biri de Görüş Mesafesi Sistemi'dir. Bu sistem, oyuncuların harita üzerinde belirli bir mesafeden fazla ileriyi görememesini sağlar. Özellikle PvP odaklı sunucularda, bu sistem sayesinde savaş stratejileri daha karmaşık hale gelir ve taktiksel avantajlar doğar. Bu yazıda, Metin2Lobby üzerinden detaylandıracağımız bu sistem, nasıl çalışır, nasıl geliştirilir ve neden önemlidir konularını ele alacağız.
Görüş Mesafesi Sisteminin Temelleri
Görüş Mesafesi Sistemi, oyuncunun karakterinin belli bir alan dışına çıkması durumunda, bu alanı render edilmeyen bir hale getirerek gizlenmesini sağlar. Bu, hem performans hem de strateji açısından büyük faydalar sağlar. Özellikle C++ tabanlı server src üzerinde geliştirilen bu sistemler, game core seviyesinde müdahaleyi gerektirir. Bu sistemlerde genellikle client src tarafında da bazı düzenlemeler yapılır.
Neden Görüş Mesafesi Sistemine İhtiyaç Vardır?
Metin2 gibi açık alan PvP oyunlarında, tüm haritayı serbestçe görebilmek bazı oyuncular için avantaj sağlayabilir. Bu da adil bir oyun ortamı oluşturmada sorun yaratır. Ayrıca, tüm haritanın aynı anda render edilmesi performansı düşürür. Görüş Mesafesi Sistemi ile bu sorunların önüne geçilir. Bu sistem, Martysama veya diğer source edit projeleri ile entegre edilebilir. Geliştiriciler, uiscript veya py gui ile kullanıcı arayüzüne bu özelliği entegre edebilir.
C++ ve Python ile Uygulama Yöntemleri
Görüş Mesafesi sistemi, genellikle C++ dilinde game server programming sırasında geliştirilir. Game ve auth katmanları arasında haberleşmeler sağlanarak, oyuncunun bulunduğu konuma göre render edilecek alan belirlenir. Python tarafında ise, py root üzerindeki modüllerle bu veriler kontrol edilir. Py GUI ile geliştirilen arayüzlerle kullanıcıya bu mesafe ayarı kolayca sunulabilir. DB core üzerinden oyuncu bazlı görüş mesafesi ayarları da saklanabilir.
Sistem Performans ve Geliştirme Zorlukları
Görüş Mesafesi Sistemi geliştirilirken dikkat edilmesi gereken bazı teknik zorluklar vardır. Öncelikle, client ve server senkronizasyonu sağlanmalıdır. Yanlış yapılandırılmış bir sistem, lag veya desync gibi durumlara yol açabilir. Metin2 compile işlemi sırasında bu sistemlerin doğru şekilde entegre edilmesi önemlidir. Core yapılar bozulmadan, sadece ilgili fonksiyonlar üzerinde değişiklik yapılmalıdır. Geliştiriciler, pack dosyalarına da bu sistemi entegre edebilir.
Metin2 Private Server Geliştirme Sürecinde Yeri
Metin2 özel sunucu geliştirme sürecinde, PvP sistem tasarımı büyük önem taşır. Görüş Mesafesi Sistemi, bu süreçte stratejik bir avantaj sunar. Oyuncular, kritik anlarda bu sistemi kullanarak rakip takımları şaşırtabilir. Channel bazlı sunucularda farklı mesafe ayarları da yapılabilir. Bu sayede her kanalda farklı oyun deneyimi sunulabilir. Metin2 development projelerinde bu sistem sıkça tercih edilir. Metin2Dev toplulukları da bu konuda aktif rol oynar.
Sonuç
Görüş Mesafesi Sistemi, Metin2 özel sunucularında stratejik oyun deneyimini artırmanın etkili yollarından biridir. C++ ve Python dillerinde geliştirilebilen bu sistem, hem performans hem de oyun mekaniği açısından büyük faydalar sağlar. Metin2Lobby olarak, bu gibi gelişmiş sistemlerin source kodlarını ve geliştirme süreçlerini paylaşmaya devam edeceğiz.
What is the View Range System?
One of the systems developed to enhance gameplay experience and add strategic depth in Metin2 private servers is the View Range System. This system prevents players from seeing beyond a certain distance on the map. Especially in PvP-focused servers, this system makes combat strategies more complex and creates tactical advantages. In this article, we will explain how this system works, how it can be developed, and why it's important, detailed through Metin2Lobby.
Basics of the View Range System
The View Range System hides areas beyond a specific range around the player's character by preventing them from being rendered. This provides significant benefits both in terms of performance and strategy. This system, typically developed on C++-based server src, requires modifications at the game core level. Certain adjustments may also be made on the client src side for these systems.
Why Is the View Range System Needed?
In open-world PvP games like Metin2, having unrestricted view of the entire map can provide unfair advantages to some players, which disrupts fair play. Moreover, rendering the whole map at once reduces performance. The View Range System addresses these issues. It can be integrated into projects such as Martysama or other source edit efforts. Developers can integrate this feature into user interfaces via uiscript or py gui.
Implementation Methods with C++ and Python
The View Range System is generally developed using C++ during game server programming. Communications between the game and auth layers determine the area to be rendered based on the player's location. On the Python side, modules under py root can be used to control these values. User interfaces built with Py GUI can easily present these view range settings to users. Player-based view range settings can also be stored via the DB core.
System Performance and Development Challenges
There are several technical challenges to consider when developing the View Range System. First, synchronization between client and server must be maintained. Incorrectly configured systems can lead to lag or desync issues. Correct integration of these systems during the Metin2 compile process is essential. Changes should only occur within relevant functions without disrupting core structures. Developers can also integrate this system into pack files.
Its Place in Metin2 Private Server Development
In the Metin2 private server development process, PvP system design holds great importance. The View Range System offers strategic advantages during this process. Players can use this system at critical moments to surprise enemy teams. Different view range settings can be applied per channel in channel-based servers, allowing different gameplay experiences per channel. This system is frequently preferred in Metin2 development projects. Metin2Dev communities also play an active role in this regard.
Conclusion
The View Range System is one of the effective ways to increase strategic gameplay in Metin2 private servers. Implemented in C++ and Python, this system provides significant benefits in terms of both performance and game mechanics. At Metin2Lobby, we will continue sharing source codes and development processes for such advanced systems.
Görüş Mesafesi Sistemi Nedir?
Metin2 özel sunucularında oyun deneyimini artırmak ve stratejik derinlik kazandırmak için geliştirilen sistemlerden biri de Görüş Mesafesi Sistemi'dir. Bu sistem, oyuncuların harita üzerinde belirli bir mesafeden fazla ileriyi görememesini sağlar. Özellikle PvP odaklı sunucularda, bu sistem sayesinde savaş stratejileri daha karmaşık hale gelir ve taktiksel avantajlar doğar. Bu yazıda, Metin2Lobby üzerinden detaylandıracağımız bu sistem, nasıl çalışır, nasıl geliştirilir ve neden önemlidir konularını ele alacağız.
Görüş Mesafesi Sisteminin Temelleri
Görüş Mesafesi Sistemi, oyuncunun karakterinin belli bir alan dışına çıkması durumunda, bu alanı render edilmeyen bir hale getirerek gizlenmesini sağlar. Bu, hem performans hem de strateji açısından büyük faydalar sağlar. Özellikle C++ tabanlı server src üzerinde geliştirilen bu sistemler, game core seviyesinde müdahaleyi gerektirir. Bu sistemlerde genellikle client src tarafında da bazı düzenlemeler yapılır.
Neden Görüş Mesafesi Sistemine İhtiyaç Vardır?
Metin2 gibi açık alan PvP oyunlarında, tüm haritayı serbestçe görebilmek bazı oyuncular için avantaj sağlayabilir. Bu da adil bir oyun ortamı oluşturmada sorun yaratır. Ayrıca, tüm haritanın aynı anda render edilmesi performansı düşürür. Görüş Mesafesi Sistemi ile bu sorunların önüne geçilir. Bu sistem, Martysama veya diğer source edit projeleri ile entegre edilebilir. Geliştiriciler, uiscript veya py gui ile kullanıcı arayüzüne bu özelliği entegre edebilir.
C++ ve Python ile Uygulama Yöntemleri
Görüş Mesafesi sistemi, genellikle C++ dilinde game server programming sırasında geliştirilir. Game ve auth katmanları arasında haberleşmeler sağlanarak, oyuncunun bulunduğu konuma göre render edilecek alan belirlenir. Python tarafında ise, py root üzerindeki modüllerle bu veriler kontrol edilir. Py GUI ile geliştirilen arayüzlerle kullanıcıya bu mesafe ayarı kolayca sunulabilir. DB core üzerinden oyuncu bazlı görüş mesafesi ayarları da saklanabilir.
Sistem Performans ve Geliştirme Zorlukları
Görüş Mesafesi Sistemi geliştirilirken dikkat edilmesi gereken bazı teknik zorluklar vardır. Öncelikle, client ve server senkronizasyonu sağlanmalıdır. Yanlış yapılandırılmış bir sistem, lag veya desync gibi durumlara yol açabilir. Metin2 compile işlemi sırasında bu sistemlerin doğru şekilde entegre edilmesi önemlidir. Core yapılar bozulmadan, sadece ilgili fonksiyonlar üzerinde değişiklik yapılmalıdır. Geliştiriciler, pack dosyalarına da bu sistemi entegre edebilir.
Metin2 Private Server Geliştirme Sürecinde Yeri
Metin2 özel sunucu geliştirme sürecinde, PvP sistem tasarımı büyük önem taşır. Görüş Mesafesi Sistemi, bu süreçte stratejik bir avantaj sunar. Oyuncular, kritik anlarda bu sistemi kullanarak rakip takımları şaşırtabilir. Channel bazlı sunucularda farklı mesafe ayarları da yapılabilir. Bu sayede her kanalda farklı oyun deneyimi sunulabilir. Metin2 development projelerinde bu sistem sıkça tercih edilir. Metin2Dev toplulukları da bu konuda aktif rol oynar.
Sonuç
Görüş Mesafesi Sistemi, Metin2 özel sunucularında stratejik oyun deneyimini artırmanın etkili yollarından biridir. C++ ve Python dillerinde geliştirilebilen bu sistem, hem performans hem de oyun mekaniği açısından büyük faydalar sağlar. Metin2Lobby olarak, bu gibi gelişmiş sistemlerin source kodlarını ve geliştirme süreçlerini paylaşmaya devam edeceğiz.
What is the View Range System?
One of the systems developed to enhance gameplay experience and add strategic depth in Metin2 private servers is the View Range System. This system prevents players from seeing beyond a certain distance on the map. Especially in PvP-focused servers, this system makes combat strategies more complex and creates tactical advantages. In this article, we will explain how this system works, how it can be developed, and why it's important, detailed through Metin2Lobby.
Basics of the View Range System
The View Range System hides areas beyond a specific range around the player's character by preventing them from being rendered. This provides significant benefits both in terms of performance and strategy. This system, typically developed on C++-based server src, requires modifications at the game core level. Certain adjustments may also be made on the client src side for these systems.
Why Is the View Range System Needed?
In open-world PvP games like Metin2, having unrestricted view of the entire map can provide unfair advantages to some players, which disrupts fair play. Moreover, rendering the whole map at once reduces performance. The View Range System addresses these issues. It can be integrated into projects such as Martysama or other source edit efforts. Developers can integrate this feature into user interfaces via uiscript or py gui.
Implementation Methods with C++ and Python
The View Range System is generally developed using C++ during game server programming. Communications between the game and auth layers determine the area to be rendered based on the player's location. On the Python side, modules under py root can be used to control these values. User interfaces built with Py GUI can easily present these view range settings to users. Player-based view range settings can also be stored via the DB core.
System Performance and Development Challenges
There are several technical challenges to consider when developing the View Range System. First, synchronization between client and server must be maintained. Incorrectly configured systems can lead to lag or desync issues. Correct integration of these systems during the Metin2 compile process is essential. Changes should only occur within relevant functions without disrupting core structures. Developers can also integrate this system into pack files.
Its Place in Metin2 Private Server Development
In the Metin2 private server development process, PvP system design holds great importance. The View Range System offers strategic advantages during this process. Players can use this system at critical moments to surprise enemy teams. Different view range settings can be applied per channel in channel-based servers, allowing different gameplay experiences per channel. This system is frequently preferred in Metin2 development projects. Metin2Dev communities also play an active role in this regard.
Conclusion
The View Range System is one of the effective ways to increase strategic gameplay in Metin2 private servers. Implemented in C++ and Python, this system provides significant benefits in terms of both performance and game mechanics. At Metin2Lobby, we will continue sharing source codes and development processes for such advanced systems.
