

Merhaba Arkadaşlar Forumda 2013 Visual Build Etme Var ama çogu arkadaşımız anlamiyordu Onlara Yardımcı Olmak için Resimli detayli şekilde anlatim Yapdim Yardimci Olduysa Ne Mutlu Bana
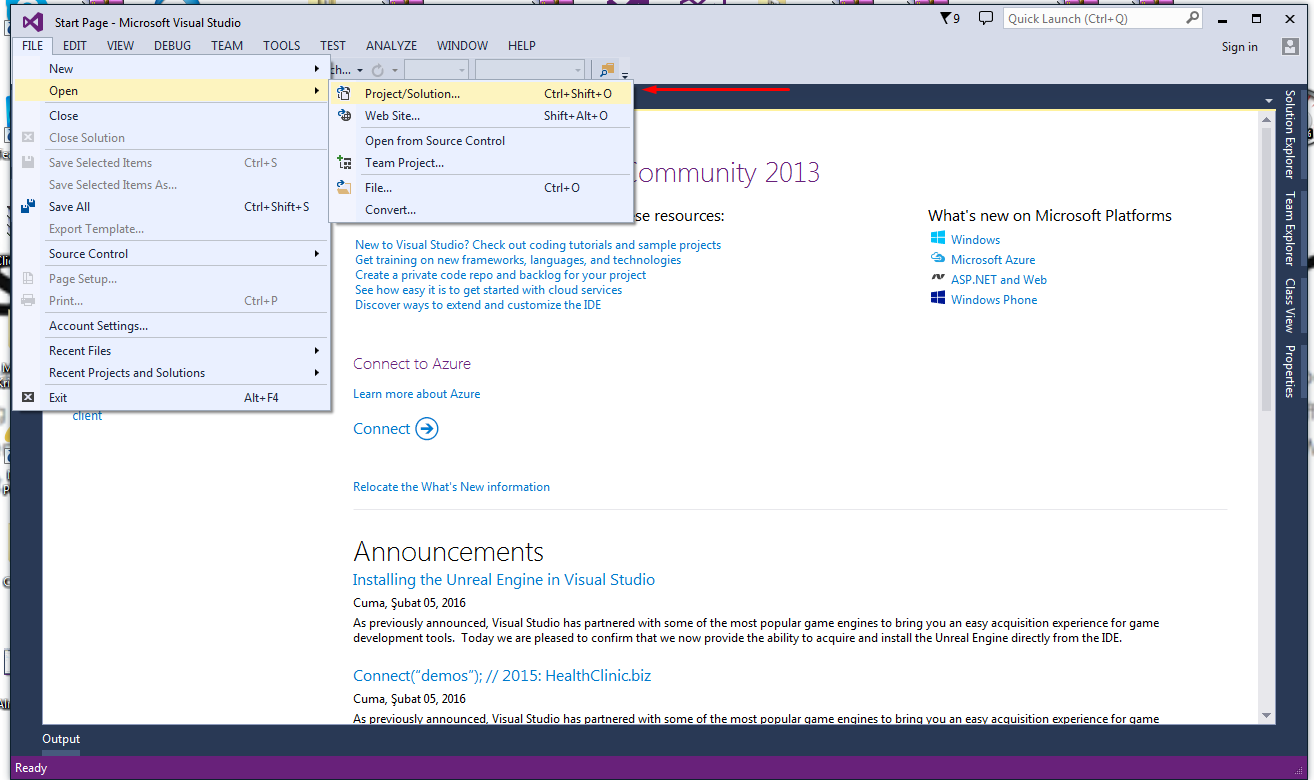
FİLE Open gelioruz acilen Sekmede Project/Solution Seçioruz
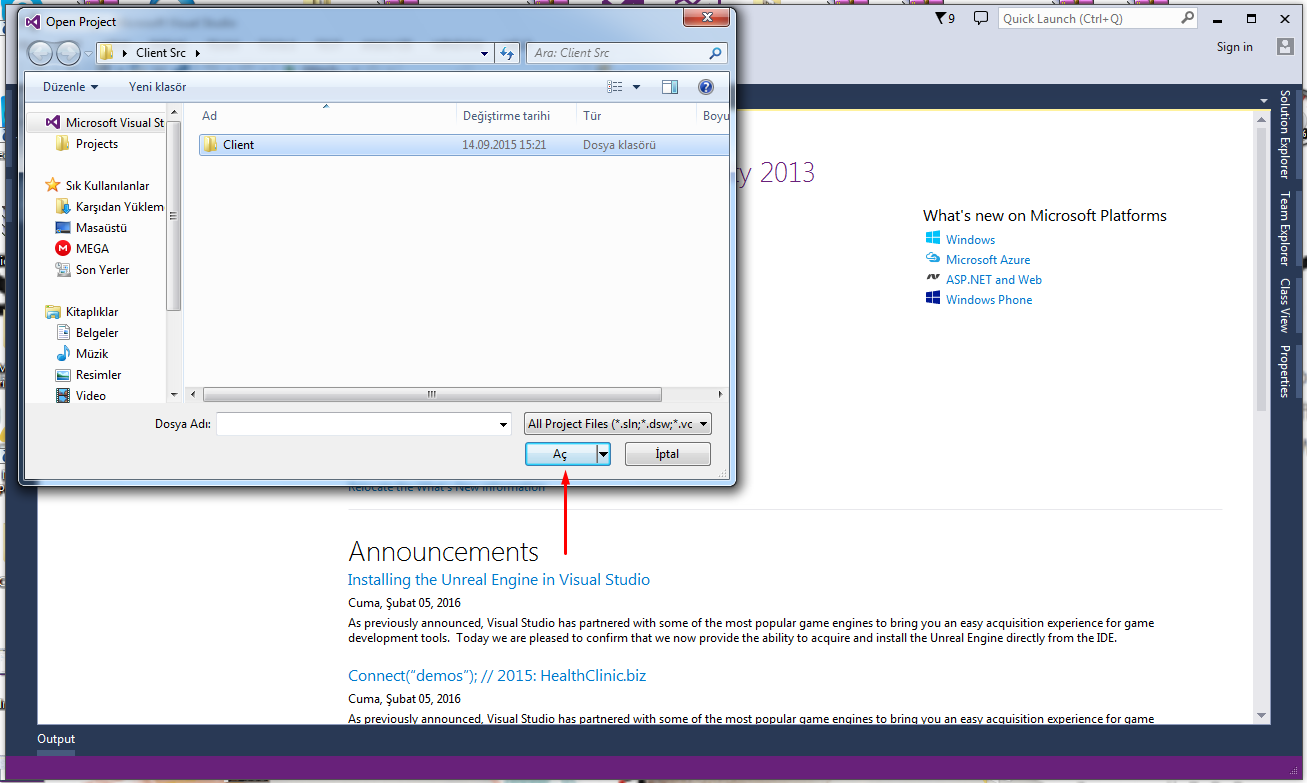
Client src mizi Masaüstüne Cikarmayi Unutmayin Ve secioruz Client Ac dioruz
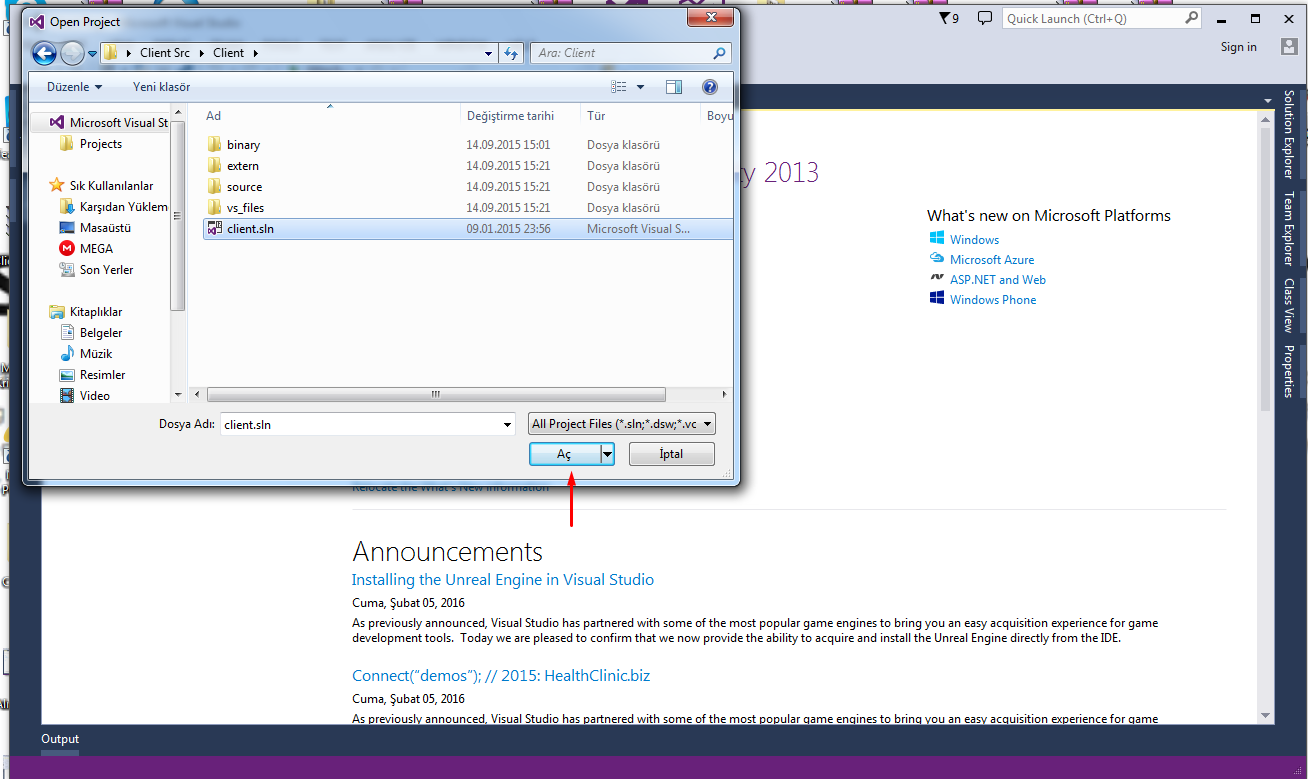
İçerisine Girior Klasorun Ve client Secioruz
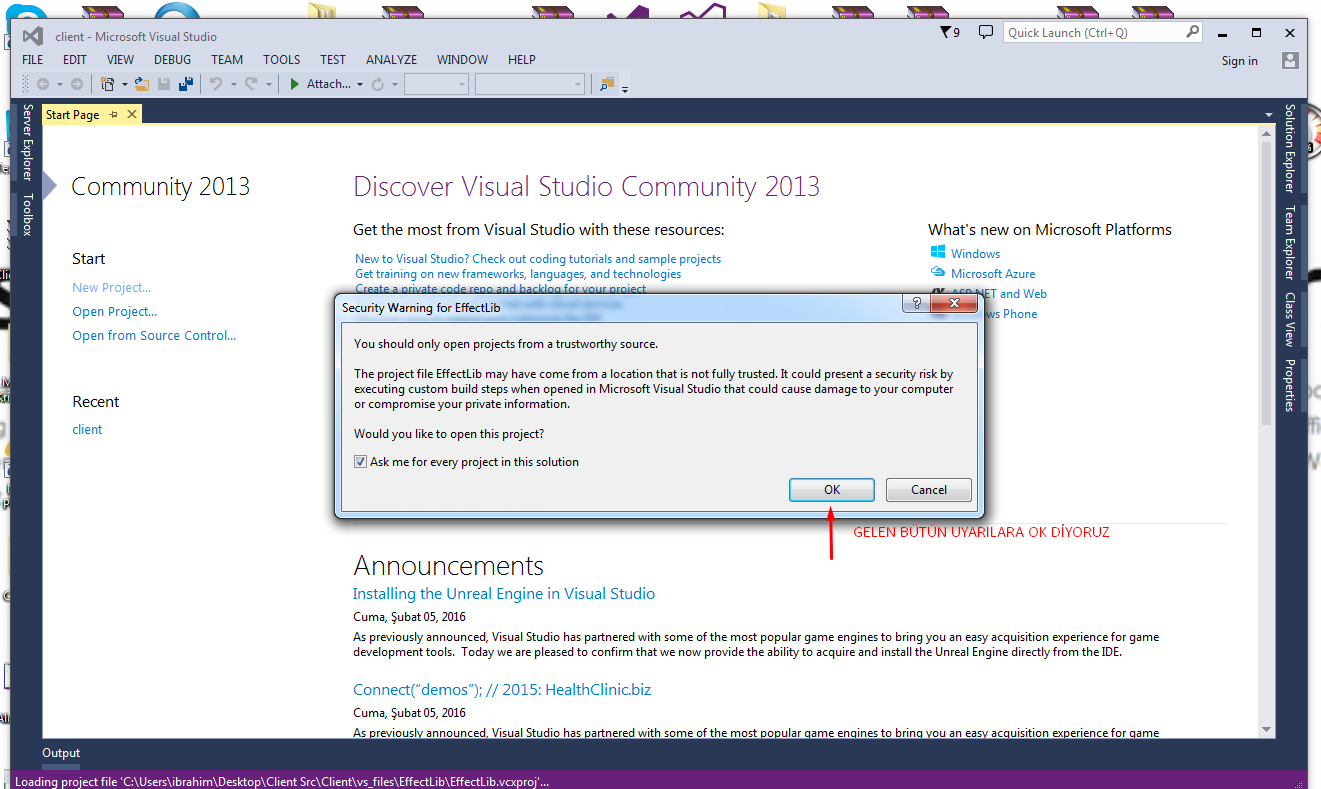
Gelen bütün Uyarılara Ok Diyoruz

Ok Dedikten Sonra Dosyalarin yüklenmesini Beklioruz.
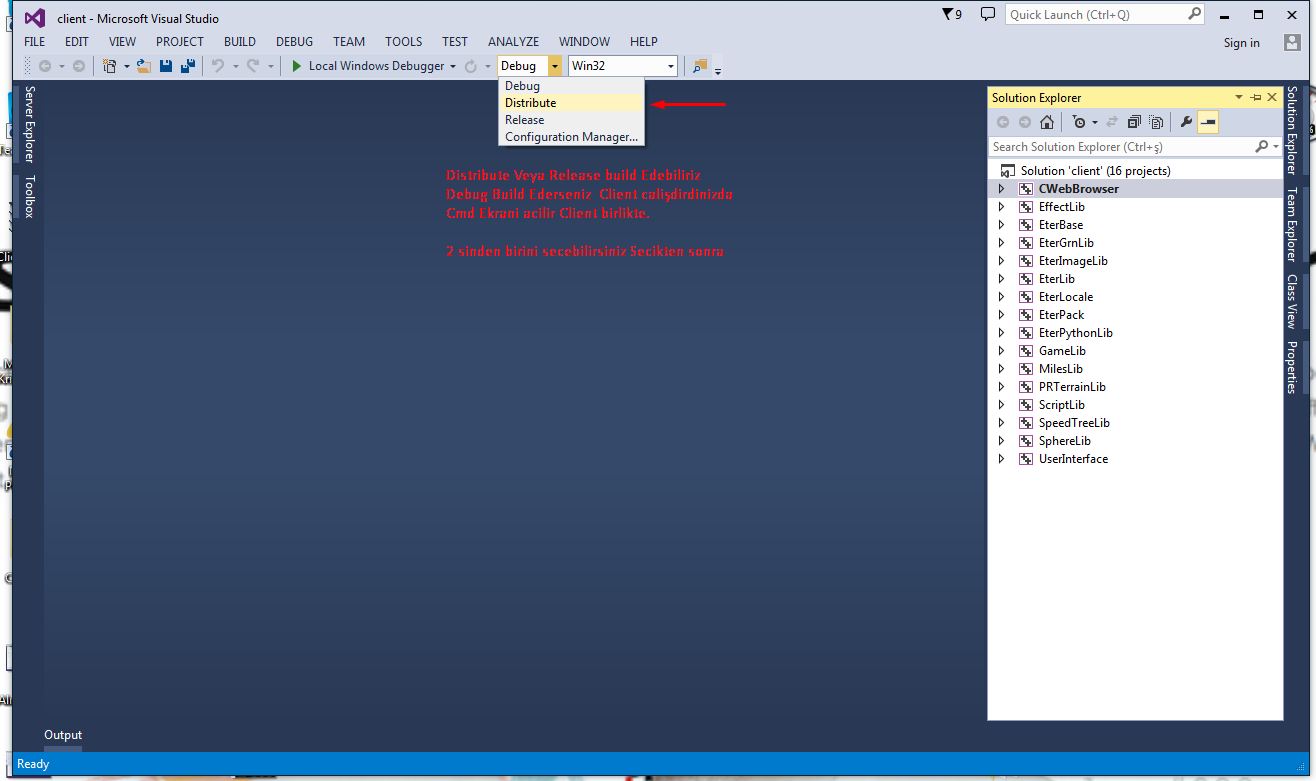
Burda Debug build Edersek Clienti caliştirinca Cmd ekranı acilir Distribute veya Release Seçersek Cmd ekrani gelmez
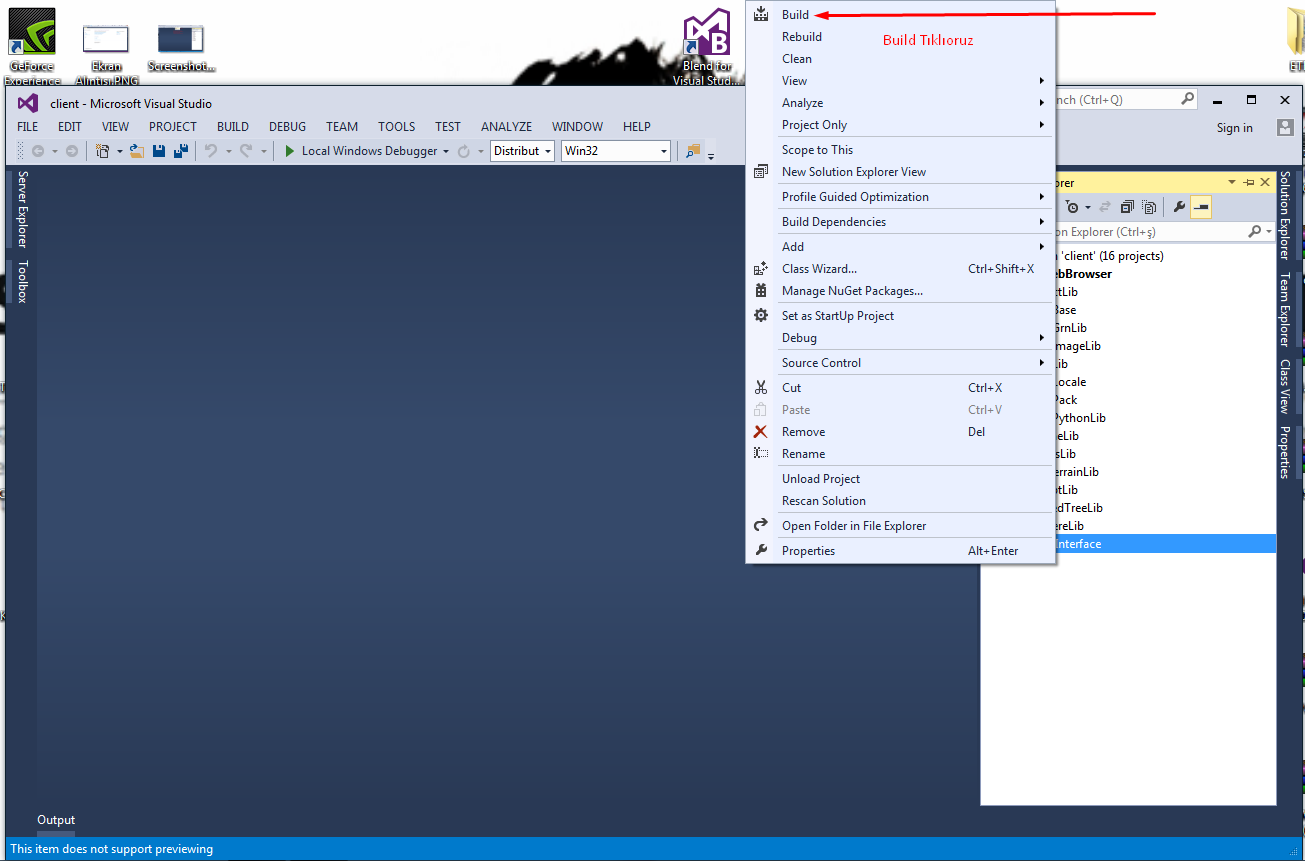
UserInterface Sağ tiklim build Tikliyoruz
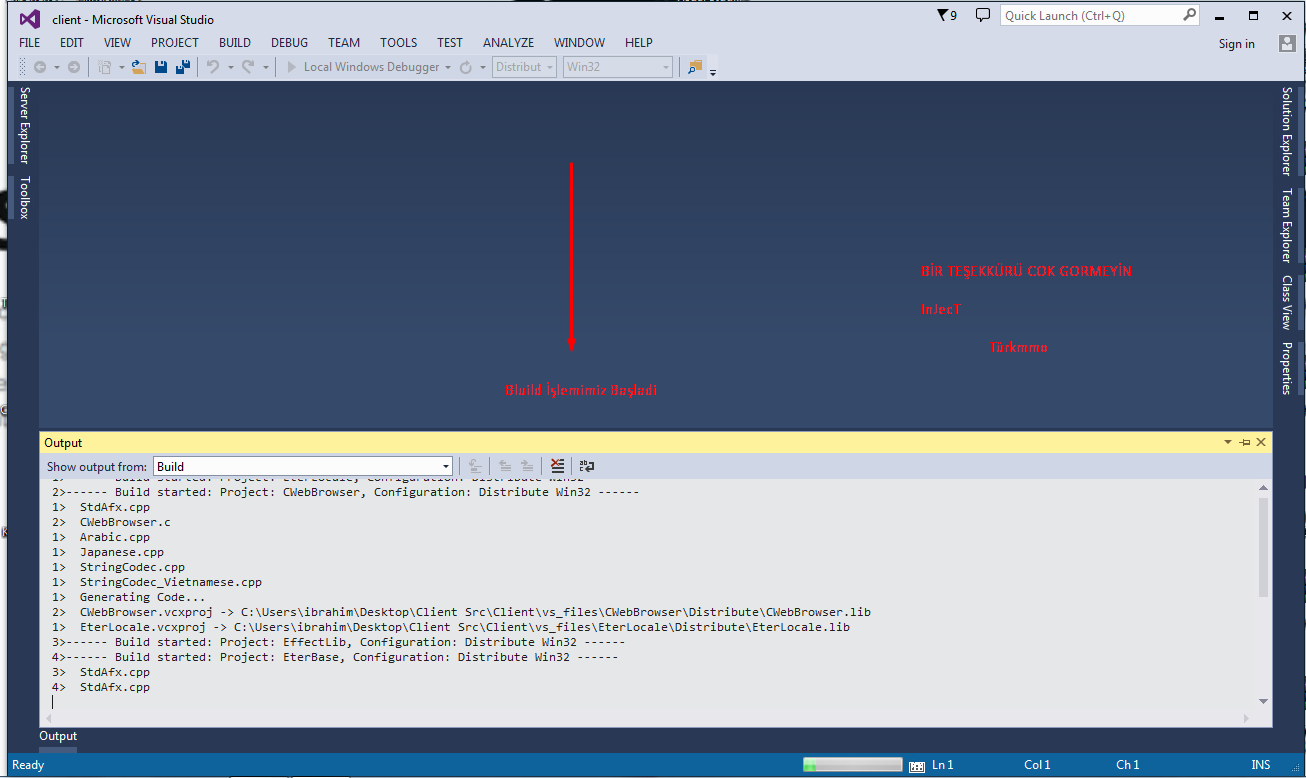
Build İşlemimiz Başladı
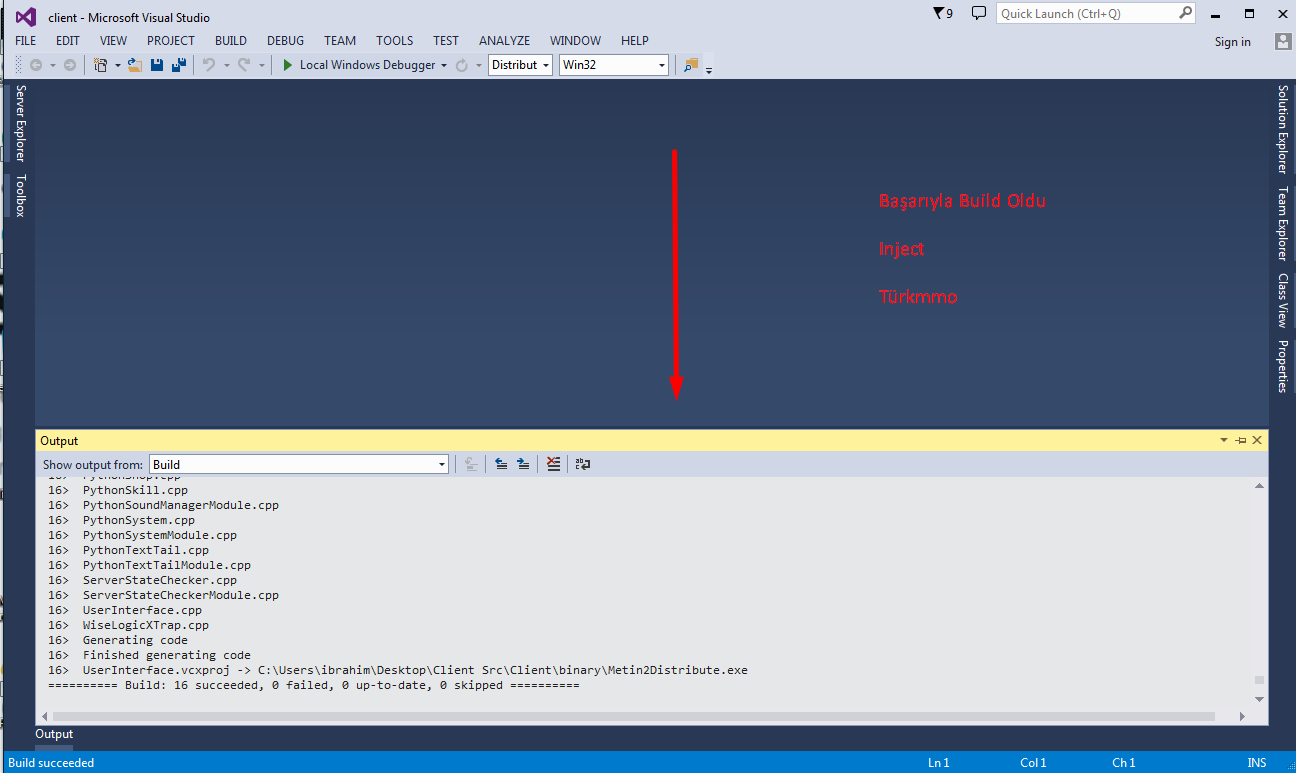
Başarıyla Build Oldu
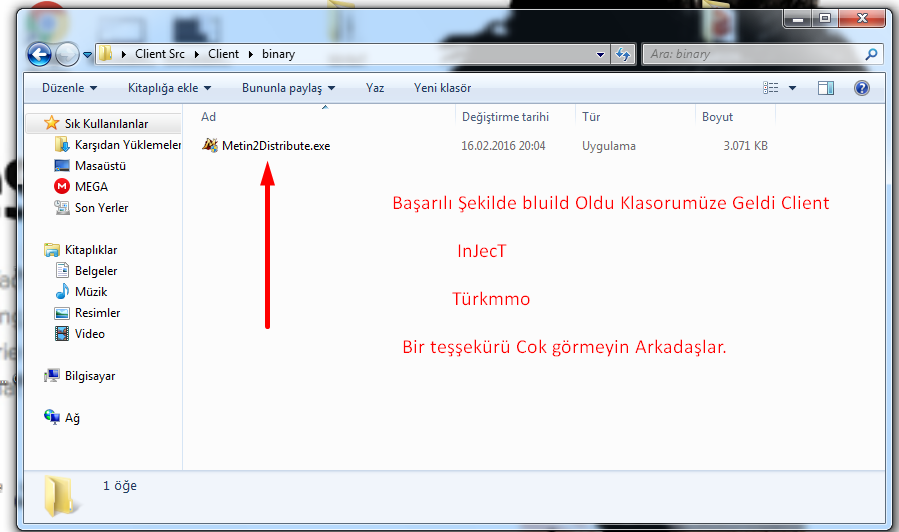
Client Klasorümüze Build Ettimiz Client geldi.
Visual 2013 indirme Linki :
Src Linki :
Virus total:
Src alıntıdır Statu'den Bana ait deildir
Metin2 Lobby olarak sunucu geliştirme konusunda aktif olan oyuncular için detaylı bir rehber sunuyoruz. Bu rehberde 2013 Visual Client'in nasıl build edileceği adım adım resimli olarak anlatılmaktadır. Bu süreçte Visual Studio, Python, Py Root, UI Script gibi önemli yapılarla tanışacak ve client src üzerinde değişiklik yapabilmenizi sağlayacağız.
Gereksinimler:
1. Visual Studio 2013 veya üzeri
2. Python 2.7 (Py GUI, Py Root için)
3. Metin2 Client Source Kodları
4. Gerekli kütüphaneler (zlib, png vs.)
5. Uygulamalar arası bağlantı (game core, db core gibi)
Adım 1: Kaynak Kodların Hazırlanması
Öncelikle client src dosyalarınızı güvenli bir konuma alın. Bu dosyalar genellikle martysama tarafından sağlanan sistemlerde gelir. Bu dosyaların içinde uiscript, root, locale gibi dizinler bulunur. Bu yapılar, client build işlemi sırasında derlenerek çalıştırılabilir forma getirilir.
Adım 2: Proje Dosyasının Açılması
Visual Studio üzerinden .sln uzantılı projeyi açın. Genellikle bu dosya Client.sln gibi bir isim alır. Proje dosyası açıldığında, Solution Explorer kısmında tüm modüller görüntülenebilir olacaktır. Burada gamecore, pack, auth, channel gibi yapılar yer alır.
Adım 3: Derleme Ayarlarının Yapılması
Configuration Manager üzerinden Debug ya da Release moduna göre derleme seçimi yapılmalıdır. Release modu genellikle daha stabil ve performanslı bir build sağlar. Build Type olarak x86 veya x64 seçimi yapılmalıdır. Bu seçim, sunucu mimarinize göre değişiklik gösterebilir.
Adım 4: Bağımlılıkların Kontrolü
Linker ayarlarını kontrol edin. libpng.lib, zlib.lib, python27.lib gibi kütüphaneler doğru şekilde eklenmiş olmalıdır. Eğer eksik varsa, bu kütüphaneleri External Dependencies kısmına manuel olarak eklemeniz gerekir. Bu adımda dikkat edilmesi gereken nokta, kütüphane yollarının doğru belirlenmesidir.
Adım 5: Build İşlemi
Rebuild Solution seçeneğini tıklayarak tüm projeyi yeniden derleyin. Derleme işlemi sırasında hata oluşursa, Output penceresindeki hataları inceleyin. Hatalar genellikle include eksikliği, kütüphane hatası veya tanımsız referanslardan kaynaklanır. Bu durumda Py Root veya UIScript dosyalarında eksiklik varsa, bunlar tamamlanmalıdır.
Dikkat Edilmesi Gerekenler:
- Py GUI ve Py Root klasörlerinin doğru konumda olduğundan emin olun.
- UIScript dosyalarında yapılan değişiklikler doğrudan istemci tarafını etkiler.
- Game Server Programming ile client arasında uyum sağlanmalıdır.
- DB Core ile entegrasyon için Auth ve Game servislerinin aynı yapıya sahip olması gerekir.
Sonuç
2013 Visual Client build işlemi, Metin2 Development sürecinde oldukça önemli bir adımdır. Doğru yapılandırılmış bir client, PvP sistemlerinizi daha stabil ve hızlı şekilde test etmenizi sağlar. Bu rehber sayesinde hem compile hem de source edit işlemlerini daha kolay gerçekleştirebilirsiniz. Daha fazla bilgi ve destek için Metin2Lobby üzerinden bize ulaşabilirsiniz.
Metin2 Lobby presents a detailed guide for players active in server development. This tutorial explains step-by-step how to build the 2013 Visual Client with images. Throughout this process, you will familiarize yourself with important components such as Visual Studio, Python, Py Root, UI Script, and learn how to make modifications on client src.
Requirements:
1. Visual Studio 2013 or higher
2. Python 2.7 (for Py GUI, Py Root)
3. Metin2 Client Source Codes
4. Required libraries (zlib, png, etc.)
5. Inter-application connections (game core, db core, etc.)
Step 1: Preparing Source Files
Firstly, place your client src files in a secure location. These files usually come from systems provided by martysama. Inside these files, directories like uiscript, root, locale, etc. are located. During the client build process, these structures are compiled into executable forms.
Step 2: Opening Project File
Open the project file with .sln extension via Visual Studio. Usually, this file has a name like Client.sln. After opening the project file, all modules will be visible in the Solution Explorer. Here, structures like gamecore, pack, auth, channel, etc. can be seen.
Step 3: Setting Up Compilation Options
Select compilation mode according to Debug or Release through Configuration Manager. The Release mode generally provides more stable and performance-oriented builds. Build Type should be selected as either x86 or x64, depending on your server architecture.
Step 4: Checking Dependencies
Check Linker settings. Libraries such as libpng.lib, zlib.lib, python27.lib, etc., must be correctly added. If any are missing, you may need to manually add them to the External Dependencies section. Pay attention to ensure that library paths are correctly set.
Step 5: Build Process
Click Rebuild Solution to recompile the entire project. If errors occur during the compilation, review them in the Output window. Errors typically stem from missing includes, library issues, or undefined references. In case of missing elements in Py Root or UIScript files, they must be completed accordingly.
Important Notes:
- Ensure Py GUI and Py Root folders are in the correct location.
- Changes made in UIScript files directly affect the client-side behavior.
- Compatibility must be maintained between Game Server Programming and the client.
- For integration with DB Core, Auth and Game services must share the same structure.
Conclusion
Building 2013 Visual Client is a crucial step in Metin2 Development. A properly configured client allows you to test your PvP systems more stably and quickly. With this guide, you can perform both compile and source edit operations more easily. For further information and support, you can reach us via Metin2Lobby.
FİLE Open gelioruz acilen Sekmede Project/Solution Seçioruz
Client src mizi Masaüstüne Cikarmayi Unutmayin Ve secioruz Client Ac dioruz
İçerisine Girior Klasorun Ve client Secioruz
Gelen bütün Uyarılara Ok Diyoruz
Ok Dedikten Sonra Dosyalarin yüklenmesini Beklioruz.
Burda Debug build Edersek Clienti caliştirinca Cmd ekranı acilir Distribute veya Release Seçersek Cmd ekrani gelmez
UserInterface Sağ tiklim build Tikliyoruz
Build İşlemimiz Başladı
Başarıyla Build Oldu
Client Klasorümüze Build Ettimiz Client geldi.
Visual 2013 indirme Linki :
Ziyaretçiler için gizlenmiş link,görmek için üye olmalısınız!
Giriş yap veya üye ol.
Src Linki :
Ziyaretçiler için gizlenmiş link,görmek için üye olmalısınız!
Giriş yap veya üye ol.
Virus total:
Ziyaretçiler için gizlenmiş link,görmek için üye olmalısınız!
Giriş yap veya üye ol.
Src alıntıdır Statu'den Bana ait deildir
2013 Visual Client Build Etme Rehberi
Metin2 Lobby olarak sunucu geliştirme konusunda aktif olan oyuncular için detaylı bir rehber sunuyoruz. Bu rehberde 2013 Visual Client'in nasıl build edileceği adım adım resimli olarak anlatılmaktadır. Bu süreçte Visual Studio, Python, Py Root, UI Script gibi önemli yapılarla tanışacak ve client src üzerinde değişiklik yapabilmenizi sağlayacağız.
Gereksinimler:
1. Visual Studio 2013 veya üzeri
2. Python 2.7 (Py GUI, Py Root için)
3. Metin2 Client Source Kodları
4. Gerekli kütüphaneler (zlib, png vs.)
5. Uygulamalar arası bağlantı (game core, db core gibi)
Adım 1: Kaynak Kodların Hazırlanması
Öncelikle client src dosyalarınızı güvenli bir konuma alın. Bu dosyalar genellikle martysama tarafından sağlanan sistemlerde gelir. Bu dosyaların içinde uiscript, root, locale gibi dizinler bulunur. Bu yapılar, client build işlemi sırasında derlenerek çalıştırılabilir forma getirilir.
Adım 2: Proje Dosyasının Açılması
Visual Studio üzerinden .sln uzantılı projeyi açın. Genellikle bu dosya Client.sln gibi bir isim alır. Proje dosyası açıldığında, Solution Explorer kısmında tüm modüller görüntülenebilir olacaktır. Burada gamecore, pack, auth, channel gibi yapılar yer alır.
Adım 3: Derleme Ayarlarının Yapılması
Configuration Manager üzerinden Debug ya da Release moduna göre derleme seçimi yapılmalıdır. Release modu genellikle daha stabil ve performanslı bir build sağlar. Build Type olarak x86 veya x64 seçimi yapılmalıdır. Bu seçim, sunucu mimarinize göre değişiklik gösterebilir.
Adım 4: Bağımlılıkların Kontrolü
Linker ayarlarını kontrol edin. libpng.lib, zlib.lib, python27.lib gibi kütüphaneler doğru şekilde eklenmiş olmalıdır. Eğer eksik varsa, bu kütüphaneleri External Dependencies kısmına manuel olarak eklemeniz gerekir. Bu adımda dikkat edilmesi gereken nokta, kütüphane yollarının doğru belirlenmesidir.
Adım 5: Build İşlemi
Rebuild Solution seçeneğini tıklayarak tüm projeyi yeniden derleyin. Derleme işlemi sırasında hata oluşursa, Output penceresindeki hataları inceleyin. Hatalar genellikle include eksikliği, kütüphane hatası veya tanımsız referanslardan kaynaklanır. Bu durumda Py Root veya UIScript dosyalarında eksiklik varsa, bunlar tamamlanmalıdır.
Dikkat Edilmesi Gerekenler:
- Py GUI ve Py Root klasörlerinin doğru konumda olduğundan emin olun.
- UIScript dosyalarında yapılan değişiklikler doğrudan istemci tarafını etkiler.
- Game Server Programming ile client arasında uyum sağlanmalıdır.
- DB Core ile entegrasyon için Auth ve Game servislerinin aynı yapıya sahip olması gerekir.
Sonuç
2013 Visual Client build işlemi, Metin2 Development sürecinde oldukça önemli bir adımdır. Doğru yapılandırılmış bir client, PvP sistemlerinizi daha stabil ve hızlı şekilde test etmenizi sağlar. Bu rehber sayesinde hem compile hem de source edit işlemlerini daha kolay gerçekleştirebilirsiniz. Daha fazla bilgi ve destek için Metin2Lobby üzerinden bize ulaşabilirsiniz.
Building 2013 Visual Client Guide
Metin2 Lobby presents a detailed guide for players active in server development. This tutorial explains step-by-step how to build the 2013 Visual Client with images. Throughout this process, you will familiarize yourself with important components such as Visual Studio, Python, Py Root, UI Script, and learn how to make modifications on client src.
Requirements:
1. Visual Studio 2013 or higher
2. Python 2.7 (for Py GUI, Py Root)
3. Metin2 Client Source Codes
4. Required libraries (zlib, png, etc.)
5. Inter-application connections (game core, db core, etc.)
Step 1: Preparing Source Files
Firstly, place your client src files in a secure location. These files usually come from systems provided by martysama. Inside these files, directories like uiscript, root, locale, etc. are located. During the client build process, these structures are compiled into executable forms.
Step 2: Opening Project File
Open the project file with .sln extension via Visual Studio. Usually, this file has a name like Client.sln. After opening the project file, all modules will be visible in the Solution Explorer. Here, structures like gamecore, pack, auth, channel, etc. can be seen.
Step 3: Setting Up Compilation Options
Select compilation mode according to Debug or Release through Configuration Manager. The Release mode generally provides more stable and performance-oriented builds. Build Type should be selected as either x86 or x64, depending on your server architecture.
Step 4: Checking Dependencies
Check Linker settings. Libraries such as libpng.lib, zlib.lib, python27.lib, etc., must be correctly added. If any are missing, you may need to manually add them to the External Dependencies section. Pay attention to ensure that library paths are correctly set.
Step 5: Build Process
Click Rebuild Solution to recompile the entire project. If errors occur during the compilation, review them in the Output window. Errors typically stem from missing includes, library issues, or undefined references. In case of missing elements in Py Root or UIScript files, they must be completed accordingly.
Important Notes:
- Ensure Py GUI and Py Root folders are in the correct location.
- Changes made in UIScript files directly affect the client-side behavior.
- Compatibility must be maintained between Game Server Programming and the client.
- For integration with DB Core, Auth and Game services must share the same structure.
Conclusion
Building 2013 Visual Client is a crucial step in Metin2 Development. A properly configured client allows you to test your PvP systems more stably and quickly. With this guide, you can perform both compile and source edit operations more easily. For further information and support, you can reach us via Metin2Lobby.
